Showing posts with label Master Grade. Show all posts

Saturday, 26 August 2017

MG 1/100 - RX-178 A.E.U.G. Gundam Mk.II part #04


There it is: A.E.U.G Prototype Mobile Suit

RX-178  A.E.U.G. Gundam Mk-II

Take a look at the mini-parts and the subtle pre-shading is truly an eye-candy.


The RX-178 Mk-II Titans version


The 2.0 frame enables the kit to pose with maximum bend limbs without looking awkward. Nice isn't it.

Thursday, 24 August 2017

MG 1/100 - RX-178 A.E.U.G. Gundam Mk.II part #03


Pre-shading check, topcoat check, mini-parts check. The assembly of the main parts i.e. limbs, gear, head the RX-178 A.E.U.G. Gundam is ready for shipping. To where?!

I build Gundam with my brother for years, so it is going to his place and finish it the kit. This kits will unite with the Titans version which was already build a long time ago. That was also the reason to open this 2.0 frame gunpla.

Till next time...

Wednesday, 9 August 2017

MG 1/100 - RX-178 A.E.U.G. Gundam Mk.II part #01

I'm back with a truly amazing kit that has open for years. It is always daunting to start cutting and sanding the parts from the runners. Covered with under a pile of papers and magazine I saw a slightly damaged kit: hey, is that my RX-178 Mk-II? The AEUG?


I immediately opened it and all the parts were cut out and NOT sorted. The idea behind it is to 'know' the kit by searching for the parts with reading the instructions. Never again.
I managed to resupply the enamel paints and thinners for the airbrushing. I have to say, airbrush makes the difference.


The mini parts were added after the paintings and topcoat (flat) and the results are really cool. After applying the deals I just kept watching and watching the details. Thinned yellow acrylic paint were applied as panel lines on the dark parts. A trick I learned on YouTube...

Tuesday, 8 August 2017

MG 1/100 - RX-178 A.E.U.G. Gundam Mk.II part #02


Applying details is challenging because one have imagine what state the Gundam needs to have. Has it been returned from battle? Is it freshly build? Or is it battered up and shot in battle?
Well I choose for the 'used' model which means that the RX-178 has been to many scouting missions and shows show marks and dirt on its gear. Not fancy, quite conservative yes.

Tamiya weathering master is good for making dirt on the shield and feet. It's just like make-up...for gunplay....

Friday, 18 October 2013

MG Aile Strike Gundam #08

Finally, the building proces comes to an end. It took me a lot of time to make it worth to publish. Every single piece of plastic has been painted, tweaked, etc. The enclosed decals are applied. The water-bases decals gave me a hard time, because it is quite difficult get it fixed properly without sliding them back and forth. Enjoy!

MG 1/100 Strike Gundam (v1.0)
I did some research on the web on which decals are applied on the PG and I wanted to repliciate the edgy look on my MG Strike. With an extra decals sheet for the Strike Gundam in particular, I have been able to boost up the MG a little bit more...on top of the mini parts. The results are beyond expectations, because I am just an amateur, really I am...


Use Mr. Hobby Decal Marker for extra adhesive power and protect it with Top Coat. It will last (almost) forever. One of the most important issues I've learned is to be patient in the process. Even though this is just my third MG kit, I can't deny the amount of parts are substantially more detailed (duh!) than a HG and RG. One needs to taken time of taking the part from the runners, snap, cut, file, sand the sprues. Then sand and wash all whole parts prior to the actual painting. My advice: take your time if you have the time, do not rush...
--

Saturday, 7 September 2013

MG Aile Strike Gundam #07

After a long pause, I've found some spare time to continue the MG Aile Strike project I started than four years (!) ago. While my stock of PG's, MG's, RG's and SD are piling up, I've been on smaller Gunpla projects in the mean time...
Well, this is the story. I graduated, found work, have been working, still working and the passion for modeling is still here. I even started Tamiya Model kits which involves glue, e.g. the epic Japanse Super GT and  the original Le Mans winner Mazda 787B.

Let's resume where I left with Morgeroete's (Aile) Strike Gundam Master Grade kit. The was a lot of rework in the leg-parts after some of my airbrush-n00b-actions. We're all learning right!
The project is 'online' again, fueled with a fresh mind and inspirations of Gunpla works from all of you.

Mini parts added on shoulder
See photo above. The added mini parts are put into place, which was quite hard if you don't have the proper tools such as (bend) tweezers and thin Tamiya glue if applicable. The results are astonishing; amazing what a few shiny parts can do to Gunpla kit. Post if you have questions on tooling... I'm wondering where I can find more of these reasonal-priced mini-parts for my Japanese plastic. Thank you in advance.


Wednesday, 12 August 2009

MG Aile Strike Gundam #06

Yes, my holiday to Asia ended a month ago, graduated thereafter; it's all good. I can spend more time on Gunpla and job applications...first things first... My brother and I started to do some Gunpla building together once in a year due to lack of time and mostly summers. Neither time nor money is saved to build one kit after another, varying from SD to MG's kits or UC to CE models. It's a building-madness.


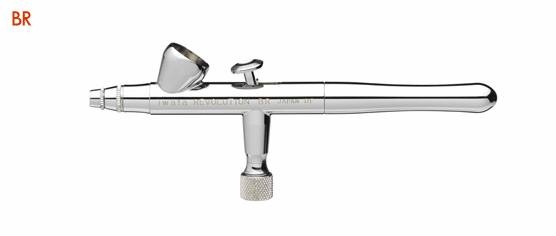
This summer we started to use airbrush for the Gundam kits. Just one decent compressor and one airbrush from the Japanese manufacturer Iwata (Revolution HP-BR). The first thing I brushed was Strike's Frame, have a look. Tamiya enamel Gunmetal grey was used. Not too bad, is it?

Tuesday, 23 June 2009

MG Aile Strike Gundam #05

When my paint and mini-drill set finally arrived, I've been able to apply the plamo-plus parts on the MG Aile Strike. It was quite a hassle, because the tubes are 1.7 mm while my range of drills goes from 1.0, 1.5, 2.0, 2.5 and 3.0. So I had to be careful not to force the remaining 0.2 mm by squeezing the tube in the plastic. I might end up in cracks and tears...

For the tight fit problem, I drilled the holes in all radial directions while the drill was in the hole and praying that I could smuggle 0.1 mm. Sometimes I drilled a few times diagonally to widen the 1.5 mm to the desired 1.7 mm. Guess what, it works perfectly. You would think that the exterior of the hole would look a bit messy by this, but the reamer will finalize it into a clean symmetric whole. One down, another 24 to go....

Source: Tamiya, Plamo-plus

Thursday, 18 June 2009

MG Aile Strike Gundam #04

The parts depicted below are going to be upgraded with the plamo-plus parts (PP-parts hereafter). There is more for the Aile pack, but that will be constructed later on. Good, I'll keep you posted on this. First, I'm going to sand all the parts before I drill the holes...or was it the other way around, haha!


Sunday, 14 June 2009

MG Aile Strike Gundam #03

Plamo-plus parts are precisely engineered and the tiny reamer tools - which are not bigger than a average tooth pick - are really sublime. I'm not joking, this guy knows what he's selling. Can you see how small the parts are. I bought silver and black tubes to compare each other how it would look like on a white-ish gunpla kit. The silver is timeless, but the black has something special. However on darker colors such as blue (chest) and black (Aile pack), black tubes won't be able to 'shine' so to speak.

Mochizuki san thanked me by adding a Lipton black tea bag and put a 'thank you' note on it. Funny guy, isn't he? I appreciate that, but I would be happier if he sold me parts with its Japanese Yen price instead of US Dollars! No, I shouldn't complain...


Friday, 12 June 2009

MG Aile Strike Gundam #02

I made some drawings of the parts that should give the kit a distingtive touch by adding custom gunpla parts. Raker's blog shared some links on Mochizuki-san's magnificent gunpla accessories. This inspired me to make my very own MG Strike Gundam even more beautiful than it already is.
Fortunately, I haven't unlearn my long forgotten hobby (in my childhood) drawing pictures and comics. I realized how difficult it could be drawing pictures by heart. No fancy drawing, I know, but you get the point. Anyway, the part that I've drawn are the shield, Armor Schneider pockets, beam rifle, skirt, chest and ankle + foot. The idea is to create a visual on where the gunpla accessories should be placed and make sense at the same time.

Tuesday, 9 June 2009

MG Aile Strike Gundam #01

There you go, a pile of colorful plastic. It's doesn't look much without the runners (such a waste isn't it?). I'll paint the launch platform well as, while I'm at it. As you can see, I've already assembled the frame to get idea what size it is going to. It is a quite slim MS.
The next step is to sculpture a tiny part of the front 'skirts' in order to give it more bite. I'm also going to carve extra grooves on several armor parts and on the shield. I think I have to make some drawings first before I ruin the kit...

Does anyone have tips for me on what tools I can use for carving (straight) shallow grooves?

Sunday, 7 June 2009

Master Grade GAT-X105 Aile Strike Gundam

The next gunpla kit will be the MG Aile Strike Gundam. Unlike my Gundam RX78-2 OYW and MS-06J Zaku II, this kit will undergo a full-fledged paint job 'by the book'. This means no washing and no battle damages. Instead, it will look as if it's straight from the GAT-X assembly line of Morgenroete Inc.
Building MG's is always something special and it amazes me with its accurate parts of the inner skeleton/frame. The nearly seamless composite components is a feast for my eyes.

Let's make the best of this kit. I'll improve it by customizing some parts slightly, give it a professional paint job and add some modest 'bling' to it. I can't wait...

This might take a small eternity, but patience my son!

Tuesday, 25 November 2008

A pile MG's to go...

I am sooooo behind schedule with building my Gundam kits, so I stack up my MG's with a foundation of HG 1/100. The reason of my extreme delay is because I still have the romantic idea of buying an airbrush kit and make the kits as stunning as my imagination. One day my friends, one day...

Saturday, 25 October 2008

MS-06J Zaku II

Finally, after a few months of delay, I managed to finish this brilliant Master Grade: Zaku with the 2.0 frame.
I used the same weathering method as I used it on the RX-78-2 Gundam OYW. This is without doubt a recommended MG kit.

MG Infinite Justice OUT NOW

The long awaited Master Grade arrived. Buy your kit and blog it. We all like to see your creation.


Source: Gundam.info

Tuesday, 12 August 2008

Upcoming MG release


Early bloggers also guessed it: The Master Grade Infinite Justice in coming to town. Something I've been waiting for...Yiehaa!
Mr. Choo is closer to the source.

Monday, 4 August 2008

RX-78-2 Gundam

E.F.S.F. Prototype Close-Combat Mobile Suit – Version One Year War 0079


The One Year War version with a 2.0 frame makes this kit one of the most popular Master Grade kits in the world. The original colors looks a little bit cheap in my opinion, so I weathered the whole Gundam with a mix of enamel flat black (XF-1), flat brown (XF-10) and enamel thinner. The ratio that was used 1:1:10.
Spray Top Coat before you weather for protection; the enamel mix is so aggressive that it warps the plastic and you might end up in tears...

Saturday, 2 August 2008

RX-78-2 Ver. Ka. footage

Take took at this video, you might have seen it already. We all know that Gunpla is famous in Japan and this man makes his models as it should be...
Part 1

Part 2